![[Updated] 2024 Approved Becoming a Streaming Pro IPhone & Android Strategies](https://thmb.techidaily.com/7dc1f793da1f2b9c448c995323e3532e944d0308246b622538179ed42958d614.jpg)
"[Updated] 2024 Approved Becoming a Streaming Pro IPhone & Android Strategies"
Becoming a Streaming Pro: IPhone & Android Strategies
How to livestream on facebook from android and iOS?

Richard Bennett
Mar 27, 2024• Proven solutions
Facebook has recently launched a live feature which would allow the users to broadcast the important moments of their live to a large audience. The live feature on Facebook would allow you to reach out to the maximum number of audience who would be able to watch your videos live on Facebook. Every time you go live on Facebook your followers will be receiving notifications so that tune in to your broadcast just on time. There are loads of filters which you can apply to make your videos even more engaging.
Steps to go live using Facebook for Android and iOS
1. The first thing you need to do is log on to your Facebook account and click the ‘whats on your mind’ button right above the Newsfeed icon on the FB app.
2. Now click the ‘Live Video’ button which comes in the shape of a person icon with a broadcast sign on the head. If you are using iOS then tap on ‘Live Video’.
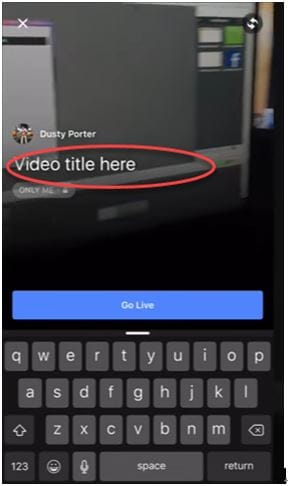
3. In the 3rd step you are required to type a brief description of the video you are posting. (However this is optional).
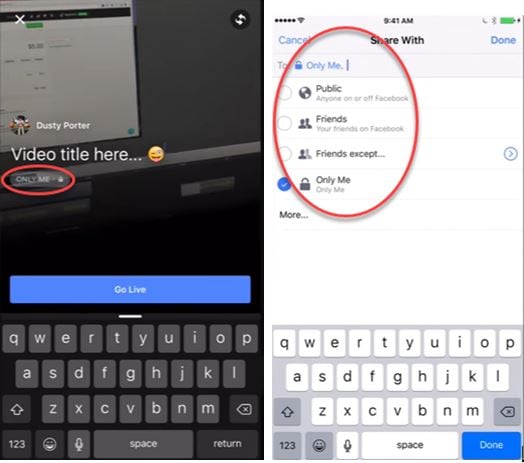
4. Now you need to select an audience for your video- you can make it public, friends or customize your audience.
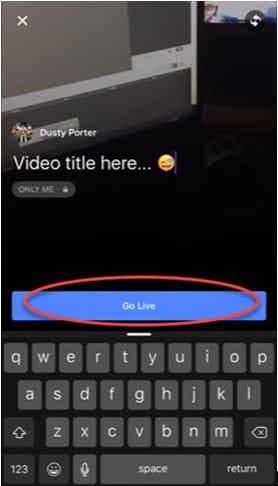
5. Now you just need to tap on the ‘Go Live’ icon and start broadcasting.
6. While streaming you will see a ‘Live’ button in red colour right on top. Clicking on this button would allow you to see the length of your broadcast. Just below this you will be seeing the comments from your viewers.
7. The camera can be changed with the help of the switch button on the top right.
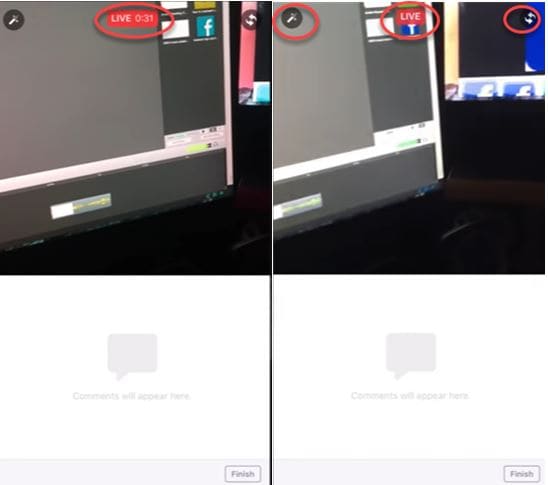
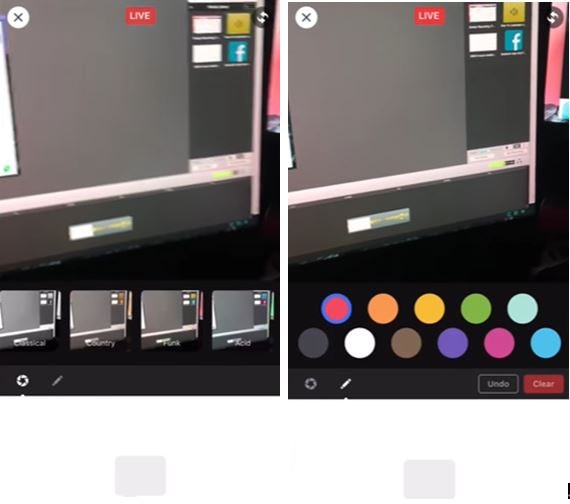
8. When you tap the top left button you get access to all the filters and colour overlays for you video.
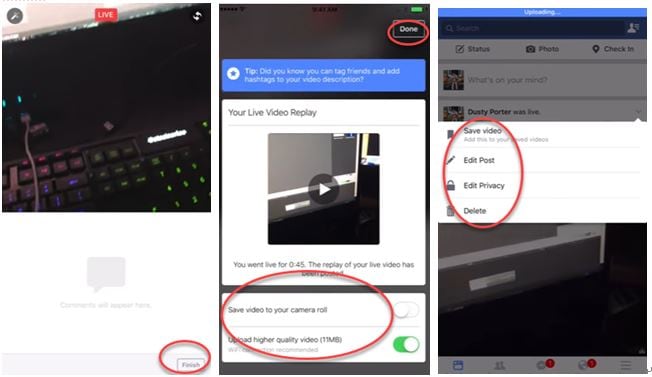
9. Once you are finished with your broadcasting just tap on the ‘Finish’ button. You can choose to play your video, save it to your computer or upload it somewhere else. Now click on done and you will be directed to another page for editing.
Notes and tips
1. You need to keep in mind that the maximum time limit for broadcasting on Facebook is 30 minutes.
2. If you get trolled by other users while broadcasting or you don’t like the comments from a viewer then you can choose to block them from the broadcast. Just click on their profile pic which appears beside their comment and hit ‘Block’.
3. Before you go live on Facebook make sure that you have fast connection. Wi-fi works best for live broadcast on Facebook. If you don’t have wifi access then try using a 4G connection. Ideally you should check the speed of your net before you start broadcasting. For this you need to go to Google Play or App Store and download the Speedtest application.
4. Once the broadcast is done the video is going to appear on your Facebook profile page and can be seen by your selected audience. However you can choose to remove the video at any time if your want.
Richard Bennett
Richard Bennett is a writer and a lover of all things video.
Follow @Richard Bennett
Richard Bennett
Mar 27, 2024• Proven solutions
Facebook has recently launched a live feature which would allow the users to broadcast the important moments of their live to a large audience. The live feature on Facebook would allow you to reach out to the maximum number of audience who would be able to watch your videos live on Facebook. Every time you go live on Facebook your followers will be receiving notifications so that tune in to your broadcast just on time. There are loads of filters which you can apply to make your videos even more engaging.
Steps to go live using Facebook for Android and iOS
1. The first thing you need to do is log on to your Facebook account and click the ‘whats on your mind’ button right above the Newsfeed icon on the FB app.
2. Now click the ‘Live Video’ button which comes in the shape of a person icon with a broadcast sign on the head. If you are using iOS then tap on ‘Live Video’.
3. In the 3rd step you are required to type a brief description of the video you are posting. (However this is optional).
4. Now you need to select an audience for your video- you can make it public, friends or customize your audience.
5. Now you just need to tap on the ‘Go Live’ icon and start broadcasting.
6. While streaming you will see a ‘Live’ button in red colour right on top. Clicking on this button would allow you to see the length of your broadcast. Just below this you will be seeing the comments from your viewers.
7. The camera can be changed with the help of the switch button on the top right.
8. When you tap the top left button you get access to all the filters and colour overlays for you video.
9. Once you are finished with your broadcasting just tap on the ‘Finish’ button. You can choose to play your video, save it to your computer or upload it somewhere else. Now click on done and you will be directed to another page for editing.
Notes and tips
1. You need to keep in mind that the maximum time limit for broadcasting on Facebook is 30 minutes.
2. If you get trolled by other users while broadcasting or you don’t like the comments from a viewer then you can choose to block them from the broadcast. Just click on their profile pic which appears beside their comment and hit ‘Block’.
3. Before you go live on Facebook make sure that you have fast connection. Wi-fi works best for live broadcast on Facebook. If you don’t have wifi access then try using a 4G connection. Ideally you should check the speed of your net before you start broadcasting. For this you need to go to Google Play or App Store and download the Speedtest application.
4. Once the broadcast is done the video is going to appear on your Facebook profile page and can be seen by your selected audience. However you can choose to remove the video at any time if your want.
Richard Bennett
Richard Bennett is a writer and a lover of all things video.
Follow @Richard Bennett
Richard Bennett
Mar 27, 2024• Proven solutions
Facebook has recently launched a live feature which would allow the users to broadcast the important moments of their live to a large audience. The live feature on Facebook would allow you to reach out to the maximum number of audience who would be able to watch your videos live on Facebook. Every time you go live on Facebook your followers will be receiving notifications so that tune in to your broadcast just on time. There are loads of filters which you can apply to make your videos even more engaging.
Steps to go live using Facebook for Android and iOS
1. The first thing you need to do is log on to your Facebook account and click the ‘whats on your mind’ button right above the Newsfeed icon on the FB app.
2. Now click the ‘Live Video’ button which comes in the shape of a person icon with a broadcast sign on the head. If you are using iOS then tap on ‘Live Video’.
3. In the 3rd step you are required to type a brief description of the video you are posting. (However this is optional).
4. Now you need to select an audience for your video- you can make it public, friends or customize your audience.
5. Now you just need to tap on the ‘Go Live’ icon and start broadcasting.
6. While streaming you will see a ‘Live’ button in red colour right on top. Clicking on this button would allow you to see the length of your broadcast. Just below this you will be seeing the comments from your viewers.
7. The camera can be changed with the help of the switch button on the top right.
8. When you tap the top left button you get access to all the filters and colour overlays for you video.
9. Once you are finished with your broadcasting just tap on the ‘Finish’ button. You can choose to play your video, save it to your computer or upload it somewhere else. Now click on done and you will be directed to another page for editing.
Notes and tips
1. You need to keep in mind that the maximum time limit for broadcasting on Facebook is 30 minutes.
2. If you get trolled by other users while broadcasting or you don’t like the comments from a viewer then you can choose to block them from the broadcast. Just click on their profile pic which appears beside their comment and hit ‘Block’.
3. Before you go live on Facebook make sure that you have fast connection. Wi-fi works best for live broadcast on Facebook. If you don’t have wifi access then try using a 4G connection. Ideally you should check the speed of your net before you start broadcasting. For this you need to go to Google Play or App Store and download the Speedtest application.
4. Once the broadcast is done the video is going to appear on your Facebook profile page and can be seen by your selected audience. However you can choose to remove the video at any time if your want.
Richard Bennett
Richard Bennett is a writer and a lover of all things video.
Follow @Richard Bennett
Also read:
- [New] Facebook's A+ Covers Ranking the Best Photo Making Websites for 2024
- [New] Seamless FB to MP4 Conversion, High Definition Options Now
- [New] Start Now Best Online Learning for New YouTubers for 2024
- [New] Tips for Trimming Down Facebook Vids' Intrusions
- [Updated] Become an FCP Virtuoso with This Guide
- Beaming Brilliance for Android Video Creation for 2024
- Dominate Facebook Traffic with Innovative Video Strategies for 2024
- In 2024, From Creator to Curator Perfect Your FB Video Sharing Skills
- In 2024, Step-by-Step Creating Stellar Content for Facebook Stories
- In 2024, Why is iPogo not working On Lava Yuva 2 Pro? Fixed | Dr.fone
- Step-by-Step Sharing Photos on YouTube
- Tips for Effective Tripod Usage in Video Blogging
- Unlocking Prime Content Top 8 Facebook Tools in '23 for 2024
- Title: [Updated] 2024 Approved Becoming a Streaming Pro IPhone & Android Strategies
- Author: David
- Created at : 2024-11-01 23:42:23
- Updated at : 2024-11-04 17:29:00
- Link: https://facebook-video-files.techidaily.com/updated-2024-approved-becoming-a-streaming-pro-iphone-and-android-strategies/
- License: This work is licensed under CC BY-NC-SA 4.0.